Showing posts with label made garment. Show all posts

Friday, January 5, 2024

Home Pattern Company 157 - Ladies' Matinee or Morning Blouse


Authorized by the American Red Cross, this pattern was produced during World War I (1914-1918.)

The pattern is referenced in Junior Red Cross Activities Teachers Manual, American Red Cross publication #606, published on October 15, 1918. The Manual is a terrific resource for understanding how war work could be integrated into school work, starting even in the primary grades. Before getting into the specifics of the articles to be produced, the manual discusses how the schools' war work can be used to teach social responsibility and contribute to community service. (See Chapter V)

Thus, while sewing clothes for refugees was incorporated into home economics instruction, it could also be used to teach geography about France and Belgium, and current events about the war. In addition to sewing skills, other aspects household economy to be taught included clothing care and repair, and clothing the baby. (See Chapter VIII)

The manual states that "The garments to be made may seem somewhat unattractive in color and design and materials used. Remember that we cannot expect the French and Belgian people to change their habits and customs and if we wish to be truly helpful we must not try to force our opinions and practices upon them when they have definite ideas as to what they wish."  (p. 301) In particular, the Belgians were thought to have a preference for dark colors, though part of this may have been due to limited resources for laundering.

At this time, the term "morning blouse" appears to be used for a garment worn at home while attending to the morning's household chores.  In the February 15 issue of Vogue magazine for 1917, patterns for morning clothes and sports clothes are shown on page 82. (A little confusingly, the model wearing Vogue's stylish version of a morning blouse is shown holding a tennis racquet.) The construction and materials used would allow the morning blouse to be laundered at home.

By the third year of high-school, students could make the morning blouse in "flannel, outing flannel, or very heavy galatea, dark colors only." (p. 362) At this time, flannel would have been understood to be wool flannel, while outing flannel was made of cotton. Galatea was a firmly woven cotton fabric, typically twill or sateen weave, usually used for nurses' uniforms and children's clothes. 

Note that the instructions on the back of the envelope explain how to make a flat felled seam, advising the maker to observe how the sleeves of a man's shirt are sewed into the armhole.  This tells us that such seams were common in men's shirts but probably not in ladies' clothing. The strengthening provided by a flat-felled seam justifies the additional time it would have taken to make the seam.

Here is a front view of the blouse made up in a dark cotton remnant, both without and with the belt:


This is an unprinted pattern.

Originally posted on 4 July 2008, substantially rewritten with new information on 5 January 2024.

Saturday, June 5, 2021

Patt-o-Rama 8500 - Apron and Bonnet


1961, based on this advertisement in the Benton Harbor Michigan News-Palladium on May 11, 1961. 

The original mailing envelope has a return address for GRIT, a periodical for rural folks. The recipient's address includes a ZIP code, putting the mailing date some time after 1963, when ZIP codes were introduced.

Patt-o-Rama is another one of those syndicated house name patterns that are so hard to research. 

Despite the "quaint old-fashioned charm," the writer still points out the functional reason for the bonnet - it shades your face. 1963 puts this bonnet pattern on the cusp of a transition from primarily functional to nostalgic or costume use. This pattern could well have served both uses. It's easy to imagine the bonnet and apron made up in red and white gingham and worn by all the ladies running booths at a church social or bazaar. Then again, this may have simply been the preferred headgear for an older woman who was accustomed to the style.

The Patt-o-rama brand is also at an interesting point in the history of unprinted patterns. By 1961 all of the big pattern companies were offering printed patterns. Patt-o-rama gamely reminds the maker that with their pattern, there are "no margins to trim," "no tracing wheels," and "no fabric waste." But again, an older woman would have grown up with unprinted patterns.

The apron pattern is entirely unremarkable (and about 10 years later, I'd make an almost identical apron in my first Home Ec class, in avocado green cotton-poly, if memory serves.)

But the bonnet was interesting. 


Did sunbonnet styles change over time? How different was this bonnet from say, Butterick 5340, from the early part of the century? Superficially, not very different, as it turns out. The overall dimensions of the crowns are almost identical.  The brim of the Patt-o-rama bonnet is shallower by about 1 1/2" (but still quite deep enough to completely shade the face - the illustration doesn't do justice to the depths of the brim.)

Interestingly, the Butterick bonnet confines the curtain to the back of the bonnet, while the Patt-o-rama bonnet brings the curtain across the bottom of the brim, to shade the sides of the neck.

The construction of the bonnets is a little different. The Butterick bonnet combines the crown and the curtain into a single piece, using a simple fold at neck level to create a casing for the back drawstring. 

The Patt-o-rama bonnet has a separate piece for the curtain (piece J, which they call a ruffle) as well as for the drawstring casing (piece I.)  Butterick assumes you'll have some narrow tape on hand to use as drawstrings. The Patto-o-rama pattern instructs you to cut and sew drawstring ties from narrow rectangles.

Patt-o-rama 8500 is a good quality pattern. The pieces are accurately cut and the notches and circles matched well. The written instructions contained a couple of slightly confusing typographical errors, and were a bit jumbled - probably from lack of space - but the construction illustrations were clear.

I made the bonnet up from some pink calico I had on hand.  Chambray would provide a slightly sturdier bonnet.


I followed the instructions almost exactly with only one exception - I bound the seam that joins the brim to the crown, both for tidiness and strength.


Monday, August 7, 2017

Simplicity 4683 - Men's, Boys' and Women's Apron


Mid 1940s.

This unprinted pattern dates to before 1946, as this is apparently when Simplicity started printing their patterns.

A nice, straightforward apron for the Gentleman and his Missus, who has also made Buddy a spiffy apron for his first Industrial Arts class.  Why the illustrator chose to show the Gentleman wearing a shop apron but gearing up for kitchen duty is a bit of mystery.  And that tiny little cookbook he's holding seems to be awfully entertaining.

Your fifteen cents really bought you a good, thoughtful design.  Note that the Men's and Boys apron is darted at the sides.  This will make the apron set close through the hips, which will probably make it safer by making it less likely to snag, and should also make it more efficient at keeping the wearer clean.


The handling of the shoulder straps and ties is clever.  The straps will adjust to almost any size or shape and don't require any hardware to fasten:


Note that the topstitching around the pockets and the edges make this a very sturdy garment.

No fabric recommendations are given, but the aprons in the illustration surely look like chambray.  Denim would also have been popular, and frequently came in the 35" width called out in the yardage requirements.


Here is the men's apron made up in denim:
Here are the side darts from the inside:

And here they are from the outside:

The instructions call for a small patch of fabric to be sewn in as a backing for the button holes on the sides.  You can see that I've sewn down the patch and stitched a rectangle to outline the buttonhole.  The button holes were worked by hand.

And in the event this apron ever wanders away, I've "branded" it.

In the future, I'd probably use a good-quality twill tape for the straps, rather than making them myself, since folding those narrow strips of denim resulted in a certain amount of questionable language as I repeatedly steamed my fingers.

This denim is wonderful to work with.  Made under the SAFEDenim brand, it's made entirely in the United States by farmers who are trying to produce a sustainable product.  Cotton is demanding of the soil and can require enormous amounts of pesticides, so producing this denim requires a lot of commitment from the farmers.  I don't know where you can buy yard goods, but if you're willing to commit to a 30 yard bolt, you can buy it from the web site.

You can get a free pattern for a very similar apron from the James Thompson web site, makers of my preferred pillow ticking.  (This apron would also look great made up in ticking.)

I'm delighted to report that Simplicity has re-issued this pattern as Simplicity 8151.  Get yours now before it goes out of print again!

Originally posted on June 8, 2011.  Additional material added to show the men's apron made up. Additional information provided on the re-print.

Friday, March 6, 2015

McCall 3610 - Ladies' Apron


About 1910.

This one seems to be related to McCall 2550, although in this case, rather than holding her palette and brush, our model holds her fluffy little dish mop, ready to bring her cut glass pitcher and bowl to a gleaming shine.

Like McCall 2550, there are no pockets in this apron; I can never fathom an apron without pockets.

The style is a little uncommon, with the narrow band across the front and the deep V back.


The pattern itself doesn't seem to have been used much, but the envelope has certainly had a hard life.

The maker must have been in a hurry when she folded up the pattern pieces, as several scraps of fabric got swept into the folds - very possibly a Stifel indigo. This is the second apron pattern I have with evidence of having been made up in an indigo calico.


I recently decided I needed an apron to keep in the sewing room, so I made up this pattern in some pink chambray I had on hand.

This pattern was produced before either fabric layout diagrams or detailed construction instructions were offered, so the maker is on her own to decide whether or not to face the yoke (I did, for strength and neatness) and how to finished the edges of the straps and upper backs.  (I cut 1 1/2" bias strips of the chambray and used them as facings.)

This apron is quite large.  The front yoke finishes to 16" and I think this apron would easily accommodate a bust measurement of about 40".  I shortened the pattern by 5" and with a 1" doubled-over hem, ended up with an apron that ends just above my ankle.  The circumference at the bottom is 80".  The ties are at mid back, which isn't as inconvenient to reach as you might think.


Originally posted on 8/27/2009.  Re-posted on 3/6/2015 to show made garment.

Sunday, January 26, 2014

McCall 1104 - Ladies' and Misses' Apron


1944

If you tell most people to close their eyes and imagine a "vintage apron" this is the apron they'll see in their mind's eye.  This apron goes by many names:  pinafore apron, bib apron, farmhouse apron, kitchen apron, full coverage apron, work apron, church ladies' apron.  The pattern companies have always offered this style of apron for their customers, though in the last 15 years or so the style has been called out more as a vintage or retro offering than work wear.

This particular pattern shows up on eBay pretty regularly.  There may be several reasons for this. It may have been considered a good teaching pattern for Home Economics classes.  For some wartime industrial jobs, this type of apron would have been acceptable work wear.  If the pattern companies reduced their new offerings during World War II, women might have had fewer choices when they went to buy an apron pattern.  I have two copies of this apron pattern.  One is pristine and unused.  And then there is this one, which I thought was much more interesting.

This pattern has had a very productive life.  Both the envelope and the pattern pieces have seen a lot of use.  This was somebody's favorite apron pattern - or perhaps the maker had neither the desire nor the means to replace a perfectly functional pattern.  I suspect she made aprons for her own use.


Observing the way a pattern has been used almost allows us to hear the maker's voice:
"I never cut that little facing piece for the back - too much trouble."
"I don't know why you'd need to a pattern piece for the strings - they're just rectangles, and anyway, I like mine narrower/wider/longer/shorter."
"I don't pay any attention to the grain line for the lower back piece - I just line up the back edge along the selvage - it's faster that way.""
"Why would I want to spend time putting those pepper appliques on a work apron?"
I decided to start the new year by making myself a new apron, and I chose to use this pattern more or less as it was provided, using the pattern pieces for the fiddly facing bits and the strings, but not the pepper appliques - my whimsy goes only so far!  The fabric is a remnant I've had in my stash for years, and regular readers will recognize the lavender gingham bias binding from an enormous quantity I cut a few years ago and use regularly.


Here's that facing piece (on the right; the upper back apron is on the left.)

This pattern specifies one inch binding - eight yards of it, finishing to 1/4 inch.  My current sewing machine doesn't have a binder attachment, and I don't trust myself to sew the binding on in one pass, so I pinned and sewed it first to the back, then folded to the front, pressed and pinned again, and finally sewing down on the front.  This is one of my very least favorite sewing operations, but I do love the look of the end result.

As usual with McCall patterns, this printed pattern was very accurate and went together very well.

Note the horizontal slashed dart in the side fronts to add bust fullness.  You can see on the inside where I've left in my yellow gathering stitches.


Although the instructions didn't call for it, I topstitched this dart for added strength.


Here's the completed apron, just before its maiden voyage to the kitchen.  I'm afraid it'll never look this nice again:


Here it is opened out, showing that it would be relatively easy to iron (if one were so inclined.)


The back is fastened with a single vintage shell button from my stash. 


I've been wearing this apron for kitchen work for about two weeks now, and I find it very comfortable. I think I understand why the pattern was used so much.


Saturday, June 18, 2011

Cosmopolitan Fashion Company 655 - Men's Outing Shirt


1898 for certain, as this pattern is listed in Cosmopolitan's Spring and Summer Catalog for that year.  Patterns for utilitarian garments tend to stay in the backlist for a while, so this may have been offered a few years earlier and later.

Cosmopolitan Fashion Co. 

The earliest newspaper reference to Cosmopolitan I've found is 1895, when several stores advertised that they'd become agents for Cosmopolitan. Whatever the list price, Cosmopolitan patterns were frequently sold for 10 cents each - a pretty decent price.


Washington D.C. Evening Star, Saturday February 2, 1985

Cosmopolitan Fashion Co asked to be declared bankrupt in April 1901, but newspaper advertisements for their patterns seem to have continued until 1906.


The Outing Shirt

The Outing Shirt was intended for an active wearer, whether in sports or in occupations such as farming. Demorest offers an excellent description of the outing shirt in their 1898 advertisement. It's hard to overstate the impact that the bicycle riding craze in the 1890's had on both men's and women's clothing.

The Buffalo (NY) Times, Thursday, March 17, 1898

Butterick's Delineator magazine offered outing shirt patterns as early as 1890. In the artistic embroidery section of their October number they illustrated a pattern for embroidery that you could work on an outing shirt. They note that their outing shirt pattern number 2096 is made up in
"French flannel and the cuffs, collar, and pockets, and the lap at the closing are prettily decorated with embroidery, which may be done in South Kensington, satin, or outline stitch as preferred. Wash-cotton is best for embroidery and it may be white or colored, according to taste." (p. 296)


A hand-embroidered outing shirt might be a nice Christmas gift for a family member.

In 1898 you could buy an outing shirt on sale for 29 cents to 50 cents at Gusky's in Pittsburg (Pennsylvania.) Percale would be a good choice for summer. 
The Pittsburgh Post, Tuesday, June 7, 1898, p. 8

Making the Outing Shirt

I decided to approach this as a maker in 1898 would.  I assumed that the pattern was accurate and usable and that it wouldn't be necessary to make up a muslin to test the pattern.  But I also decided to take some measurements in order to forestall surprises and to use inexpensive fabric.

I removed the pattern pieces from their envelope for the first time since they'd been originally packaged 112 years earlier.  Both the envelope and the pattern pieces were in very fine condition.  Here is what the eleven pieces looked like immediately after I'd unfolded them.


I let the pattern pieces relax overnight before ironing them with a dry iron on very low heat.  This looks a little more promising:


The pieces are, from upper left and as described on the envelope:  Sleeve Lap, Sleeve, Cuff, Collar, Neck-band, Yoke, Back, Front, Lap for Front and Two Pockets.  And remember:


The reason for this is stated in the catalog:


The 19th century maker would have laid out the pattern pieces on the fabric and traced a solid line around them with tailor's chalk or a soft pencil.  She would then cut outside this line to add the seam allowances.  Because the actual stitching line has been traced in chalk, it's sufficient to cut the seam allowances by eye and trim them even during construction.  She could also have marked a measured seam allowance, usually a dashed line, and cut along this line. (However, by 1900 Cosmopolitan had added seam allowances to their pattern, probably to compete with other pattern companies.)

Adding your own seam allowances also allows you to use different seam allowances for different parts of the garment, and I'll come back to this idea a little later.

I never sew with patterns this old, so I rolled out my pattern paper and traced all of the pieces.


Note that the pattern pieces are placed under the pattern paper so that they're protected.  It's quite easy to feel the edges of the pieces with the tip of your pencil and be guided by them as you trace.  For speed, I use a ruler for drawing in any straight lines.  You can see that I've added a uniform half inch seam allowance.  In fact, a better plan would have been to add half inch seam allowances for the shirt's side, yoke, and sleeve seams and quarter inch seam allowances for most of the other seams, since this would save having to trim these seams during construction.

The pattern pieces show a reasonably comprehensive set of notches and perforations.


I made up the shirt in an inexpensive chambray, one of the many fabrics recommended for outing shirts.   My chambray was 54" wide, which I pre-washed in hot water.  The instructions on the pattern envelope suggest that 3 3/8 yard of 36" fabric would be needed for this size 40 shirt.

Here's the layout.  Can you spot the mistake I've made?


Look carefully and you'll see that I've laid out the front of the shirt along the selvedge. It should be laid out on the fold.

It's my usual practice to cut my notches as short snips and to thread mark all other markings, so I did the same here.  I use two strands of darning cotton and a millinery needle to make my thread markings.


The instructions on the envelope (separate instructions sheets won't start showing up until the 1920's) describe how the pieces are put together, but the maker is expected to know what constitutes good shirt-making technique.  For men's shirts the collar, neck-band and cuffs are almost aways interlined for body and sturdiness.  One of my Women's Institute books recommends using the shirt fabric itself for this interlining.  There is something to this.  When the collar wears thin it can be discretely darned to the interlining. (When this is no longer possible the collar can removed, turned over, and re-attached. Ask your grandmother how much fun turning the gentleman's collars was back in the old days.) However, I felt that the chambray was a little too heavy to work well for this, so  I interlined the collar, neck-band and cuffs with a fairly lightweight unbleached muslin.  I have a cheat for doing this.  I pin the cut pieces to the muslin rather than the paper pattern pieces.  This means that as soon as I cut the pieces out, I'm ready to do the basting.  Here I'm ready to pin the collar to the muslin.


And here is the completed basting.  I don't use a special basting thread.  I just examine my thread board for the ugliest color I can find and use that.  Honestly, I don't know how I ended up with a spool of bright yellow thread.  Using a basting needle makes this a very quick job to do.


And now I'm ready to start sewing.  As much as possible, I tried to construct the shirt in exactly the order specified in the original instructions.  I also wanted to do as much of the sewing on the machine as possible, for both speed and sturdiness.  Because the outing shirt was athletic wear in its time, it needed to hold up to strenuous activity, such as tennis, which you can just make out being played in the background of the illustration.


So here we go.
"Open the front from neck edge as far as single notch and sew the front lap to the left front by notches with the seam on outside, then fold lap over front on line of perforations.  Sew a facing or underlap to the right side of the slash and close the front with button holes.  Stitch the pockets to position, placing the large pocket on the left front and the small on right side."
There is no pattern piece for the underlap; you're expected to know how to take measurements of the shirt and the neck-band and cut a rectangle of the right size to allow the shirt to close correctly.  To give you a sense of proportions, one of my sewing books of about the same period indicates that the front opening should be waist-depth.

There were no indications on the pattern pieces as to the placement of the pockets, so I guessed (incorrectly, as it turned out.)


Next:
"Slightly gather the upper edge of back between the notches, sew to lower edge of yoke by notches and join the side seams as far as single notches, finishing the seams with small gussets."
A gathered back is a common feature in outing shirts, providing some additional ease.

In the matter of the yoke I did deviate from the original instructions.  I cut a facing for the yoke, both for strength and for neatness of finish on the inside of the shirt.  This meant that the shirt back was sewn first to the facing.  My approach to sewing on the yokes was to turn up on the seam allowances and top stitch to the shirt back.  Here is the back sewn to the yoke facing.  Unfortunately, I removed the hand-basting stitches before I took the photograph.


And here is a close up.  The top two rows of stitching are the machined gathering stitches.


For both yokes, I machined along the seam line, notched to the line of stitching, and then pressed the seam allowance up.


Thus prepared, the yoke was then carefully basted to the shirt before being machine stitched. (Once again, I don't seem to have taken any pictures showing the basting.  With the exception of the side seams, every seam on the shirt was hand basted before machining.)  Here is a close up of the right side of the shirt, showing the yoke edge-stitched to the shirt back.  I'm currently using a 1945 Singer treadle machine for all of my sewing.  I used a short stitch length throughout the shirt.


Here is the wrong side, where the effect is of edge stitching, which attaches the yoke facing to the shirt, and top stitching, which attaches the yoke to the shirt.  I was pleased with how well this came out, which I owe to the hand basting.


Although I didn't take any pictures of this, I basted the yoke and yoke facing together.  This functioned as stay stitching to prevent the neck and sleeve curves from getting stretched.

The maker is expected to decide on a seam finish for the side seams.  I used a flat felled seam.


The maker is also left to decide what kind of gussets she wants to use (and how large or small to make them.)  My preferred way of handling hip gussets is to cut triangles.  The edges are all turned under, and the base of the triangle is sewn to the inside of the shirt...


 ...then the tip is turned over to the right side and sewn down.


Next:
"Sew the lap to slash in sleeve by notches with the seams on the outside, then fold the lap over on line of perforations, stitch to position as indicated by corresponding perforations and narrowly hem the unnotched edge of slash."
And here is a fairly uninspiring shot of the newly placketed sleeves.  The bits of tape are to indicate the right sides, as I have a real genius for unintentionally making two left sleeves or two right sleeves.


Next:
"Gather the sleeve on lower edge between the notches and stitch the cuff to lower edge of sleeve."
Unfortunately, I took only one picture of this operation.  Here you see two rows of pink hand-gathering threads and one row of red thread basting the sleeve to the cuff.  You can't see the cuff because at this point it's on the inside of the sleeve.  After I sewed it down, I turned it over to the outside on its fold line and edge stitched the cuff to the right side.


Next:
"Sew the arm's eye to sleeve, three-fourths of an inch from the edge of sleeve, placing the seam in sleeve at side body seams (the single perforation indicating the front), and stitch the upper edge of sleeve to position."
The 3/4" offset from the edge was a real head scratcher, and I basted in the first sleeve a couple of times before I thought I had it right.  What that 3/4" gets you is sufficient material to make a very sturdy felled seam.  Again, remember that this shirt is athletic wear, and the sleeve seam can be expected to take a lot of stress.  A shirt is ruined if the sleeves pull out, since there is seldom enough sound fabric left to make a repair.  One test of a well-made pattern is the accuracy of the sleeve fit, and this pattern passed the test with flying colors.  It was at this point I realized that I'd sewn the pockets in far too high, so I reset them a bit lower.

And finally:
"Stitch the collar between the neck-band by notches and the neck-band to neck by notch."
It's important to get the collar set correctly because it frames the face and thus gets a lot of visual attention.  The band must be centered correctly on the shirt, and the collar must be centered correctly on the band.  The collar points should spread symmetrically and be the same length.  

Collars are not trivial to do well.  You're working with relatively small, narrow pieces of fabric that have just enough curvature to make accidental stretching a concern.  Once you're ready to attach the collar to the band, you'll be working with multiple layers of fabric and narrow seam allowances.  Given the very brief instructions, it was up to the maker to have solid shirt-making skills to guide her to a happy result. 

The pattern was accurately notched, but I failed to notice a very odd thing until I'd sewn the collar to the band:  the collar is the same length as the band.   Because the band overlaps when buttoned, this means that the collar fronts overlap as well.  I don't think I've ever seen this in photographs of the period - to the contrary, the gap between the collar fronts can be quite substantial.  This gap is necessary to accommodate the knot of the neck tie, and the 19th century being what it was, a gentleman might choose to wear a tie with his outing shirt. (Our model wears what is probably a soft silk neckerchief.)

On examining the original pattern pieces, I discovered that the neck band extends beyond the collar by 1/2 inch on either side, so at some point I managed to introduce an error, either in inadvertently stretching the collar or in mismanaging my seam allowances.  Now that I know that overlap is an error, the solution is to rip out the collar, restitch the front edges and re-apply the collar to the band.  In fact, a thrifty, thoughtful maker would have made an extra collar at the same time she did the original construction and stored it away against the day the original collar could no longer be darned or turned.

Button placement was not indicated on the pattern pieces, leaving this to the maker.   Having a large stash of old mother of pearl buttons, I could afford to be generous with the buttons.  I worked the buttonholes by hand.  My normal method of working button holes is to work a one-stitch wide box of double running stitch, slash inside the box, and then button hole stitch all around the box, bringing up the thread for each button hole stitch just outside the double running stitches.  

However, a plain sewing manual of about the same period as the shirt recommended simply overcasting the cut edge and then working the buttonhole stitch, so I decided to give this a try. This approach is probably fine for a more firmly woven fabric than chambray, but my results were somewhat uneven.  This wasn't helped by the fact that I simply used a doubled sewing cotton (and a fair amount of beeswax) for my stitching, as the only button hole thread I had on hand at the time is part polyester, which I don't care for.

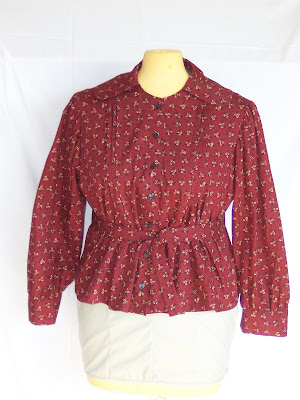
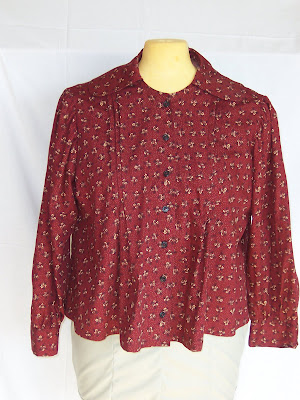
Here is the finished product, overlapped collar, wonky button holes and all:


For a stated size of 40" chest, here are some measurements:

Circumference under the arm = 50 1/2"
Neck from center of button hole to center of button = 17 1/8"
Sleeve from center bottom of neck band at back, to edge of cuff = 32 1/2"
Circumference of cuff = 10"
Front length from bottom of neck band = 29 1/4"
Back length from bottom of neck band = 34 1/4"
Length of front placket = 19 3/4"

And what about that little pocket?  My guess is that it's a watch pocket.  I can tell you from personal experience that it's impossible to get your watch out of a watch pocket set into your waistband when you're seated, so putting this small pocket in the shirt would make the watch accessible while the wearer was seated riding (either a bicycle or a horse are possible for 1898) or in a canoe, for example.


And here the shirt is again, styled with my favorite red spotted handkerchief, and showing how the small pocket might have been used as a watch pocket:


Originally posted in 2009, entirely re-written in 2011, following construction of the shirt. Additional details about outing shirts and Cosmopolitan added in December 2024.